Showing posts with label Repair. Show all posts
Showing posts with label Repair. Show all posts
Monday, September 2, 2013
Service and repair manuals
This will be a great collection of service and repair manuals for cars and motorcycles.
Stay put and subscribe to feed.
Because the size of the files, they will be uploaded on third party server for you to download.
Readhere - Service and repair manuals
Stay put and subscribe to feed.
Because the size of the files, they will be uploaded on third party server for you to download.

Wednesday, July 31, 2013
Audi A4 B5 ABS Controller Pump Repair
The problem begins with three beeps, a solid yellow ABS light and a flashing red brake light. My problem was with a 1998 Audi A4 with Quattro (and EDL). The warning may come on momentarily while you are driving and go away, but in most cases will become more prevalent as time goes on. It seems to be a common problem with Audi A4 and VW Passat B5 models. These models use the Bosch 5.3 ABS system.
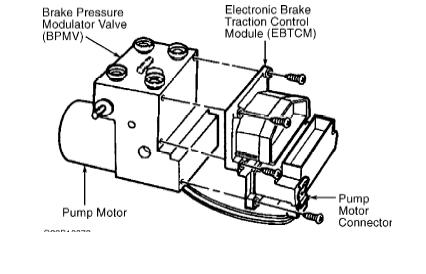
The ABS module is located under the hood on the driver’s side. It is composed of three parts, the Electronic Brake Traction Control Module, Brake Pressure Modulator Valve and the Pump. Most of the ills on the ABS system center on the Control Module. The Control Module houses the computer and electronics that make the ABS work. In fact, the Control Module does not even need any instruction from the main ECU to work. The only communication between the ECU and the Controller is to turn the ABS light on and off and to interface for Diagnostic Trouble Codes and testing functions. On cars with ESP, there is also a module under the back seat that monitors the yaw of the vehicle and can apply braking to any of the four wheels to control unstable handling conditions.
To troubleshoot the “ABS light on” condition do the following:
Connect the car to a VAG scanner. Select 03 for ABS Brakes controller. If you receive codes related to wheel sensors proceed with a wheel sensor diagnostics (not covered by this article). If there a problem with the control module you will most likely get a code like the following:
Control Module Part Number: 8E0 614 111 M
Component and/or Version: ABS/EDS 5.3 QUATTRO D31
Software Coding: 0273004134
Work Shop Code: BB 24302
1 Fault Found:
01203 - Electrical Connection between ABS and Instrument Cluster
03-10 - No Signal – Intermittent
Do not be fooled by the Instrument Cluster error. This not really the problem. I have read many posts on message boards about people spending a lot of money replacing the Instrument Cluster only to find it did not fix the problem.
Another error that you with a faulty Control Module is the following:
Control Module Part Number: 8E0 614 111 M
Component and/or Version: ABS/EDS 5.3 QUATTRO D31
Software Coding: 0273004134
Work Shop Code: BB 24302
1 Fault Found:
65535 - Internal Control Module Memory Error
35-00 - -
Once you have determined the ABS module is at fault you have three choices: Buy a new ABS unit, buy a used ABS unit, or have your current Control Module rebuilt. Audi does not sell the control unit by itself. You must purchase the entire unit Control Module, Pump and Valve assembly. In my case, for a “8E0 614 111 M”, the cost was $1950. This would also involve bleeding the whole brake system.[Editors note: It is possible to purchase the electronic part directly from Audi, but the cost is still higher than the cost of the options listed here.]
An easier, less expensive option is to purchase a used unit or get your Control Module rebuilt. In both cases, removing the Control Module and not breaking into the hydraulics is a more attractive option.
If you are purchasing a used unit, be aware the part number is very important, especially the last letter. Most of the Audi and VW Bosch 5.3 units start with the same nine numbers. There is some switching around of part numbers that can be done, but I don’t have any information on these options.
I successfully repaired my Control Module through a company in Florida called Auto and Truck Electronics (www.autoecu.com). The repair was $350 plus shipping. Be sure to call first to see if they can rebuild your controller before proceeding.
The module is not difficult to remove.
1. Jack up front left side of the car and support with a jack stand.
2. Remove the wheel.
3. Remove inner plastic fender liner. It is attached with 11 Torx head screws (T25).
4. Remove the windshield washer bottle. It is attached by three 10mm screws. Two are accessible through the fender, and the other shares a screw with the power steering bottle. Also remove the hose between the other half of the windshield washer bottle. This will take a little tugging. Be sure to have a bucket ready!
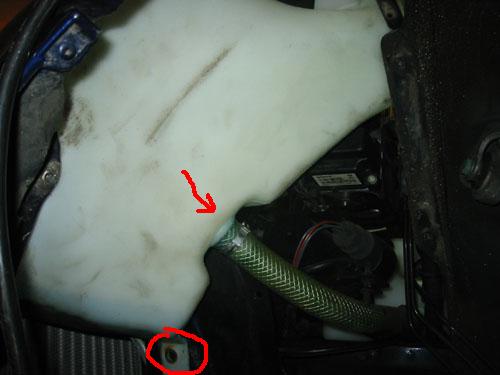
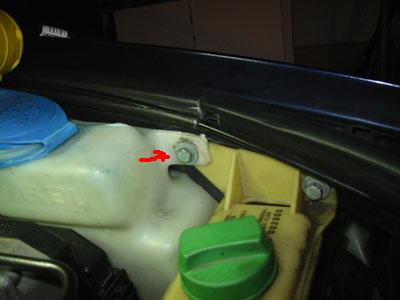
5. The ABS controller will now be accessible. Carefully remove the pump power wire from the bottom of the controller.
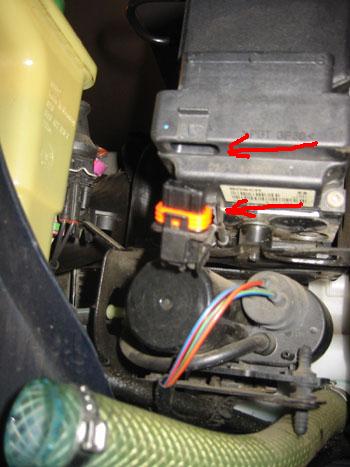
6. Remove the main harness connector from the ABS Module by pulling the connector pull shown.
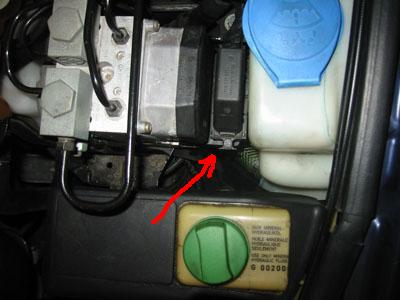
7. Separate the ABS Controller from Value/Pump assemble by unscrewing the six Torx screws (T20). Carefully remove.
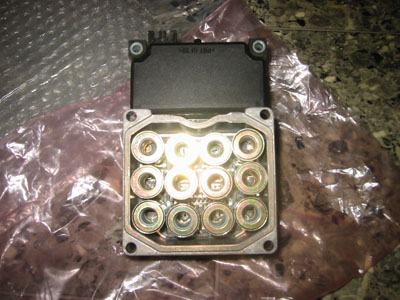
8. Prepare to the Module to ship by securing the solenoids so that they will not move around during shipping and wrap in something like bubble wrap.
9. After you receive the repaired Module back, assembly is the reverse of the previously detailed procedure.
10. After reinstallation, it may be necessary clear DTCs with a VAG scanner to clear the ABS light.
Readhere - Audi A4 B5 ABS Controller Pump Repair
The ABS module is located under the hood on the driver’s side. It is composed of three parts, the Electronic Brake Traction Control Module, Brake Pressure Modulator Valve and the Pump. Most of the ills on the ABS system center on the Control Module. The Control Module houses the computer and electronics that make the ABS work. In fact, the Control Module does not even need any instruction from the main ECU to work. The only communication between the ECU and the Controller is to turn the ABS light on and off and to interface for Diagnostic Trouble Codes and testing functions. On cars with ESP, there is also a module under the back seat that monitors the yaw of the vehicle and can apply braking to any of the four wheels to control unstable handling conditions.
To troubleshoot the “ABS light on” condition do the following:
Connect the car to a VAG scanner. Select 03 for ABS Brakes controller. If you receive codes related to wheel sensors proceed with a wheel sensor diagnostics (not covered by this article). If there a problem with the control module you will most likely get a code like the following:
Control Module Part Number: 8E0 614 111 M
Component and/or Version: ABS/EDS 5.3 QUATTRO D31
Software Coding: 0273004134
Work Shop Code: BB 24302
1 Fault Found:
01203 - Electrical Connection between ABS and Instrument Cluster
03-10 - No Signal – Intermittent
Do not be fooled by the Instrument Cluster error. This not really the problem. I have read many posts on message boards about people spending a lot of money replacing the Instrument Cluster only to find it did not fix the problem.
Another error that you with a faulty Control Module is the following:
Control Module Part Number: 8E0 614 111 M
Component and/or Version: ABS/EDS 5.3 QUATTRO D31
Software Coding: 0273004134
Work Shop Code: BB 24302
1 Fault Found:
65535 - Internal Control Module Memory Error
35-00 - -
Once you have determined the ABS module is at fault you have three choices: Buy a new ABS unit, buy a used ABS unit, or have your current Control Module rebuilt. Audi does not sell the control unit by itself. You must purchase the entire unit Control Module, Pump and Valve assembly. In my case, for a “8E0 614 111 M”, the cost was $1950. This would also involve bleeding the whole brake system.[Editors note: It is possible to purchase the electronic part directly from Audi, but the cost is still higher than the cost of the options listed here.]
An easier, less expensive option is to purchase a used unit or get your Control Module rebuilt. In both cases, removing the Control Module and not breaking into the hydraulics is a more attractive option.
If you are purchasing a used unit, be aware the part number is very important, especially the last letter. Most of the Audi and VW Bosch 5.3 units start with the same nine numbers. There is some switching around of part numbers that can be done, but I don’t have any information on these options.
I successfully repaired my Control Module through a company in Florida called Auto and Truck Electronics (www.autoecu.com). The repair was $350 plus shipping. Be sure to call first to see if they can rebuild your controller before proceeding.
The module is not difficult to remove.
1. Jack up front left side of the car and support with a jack stand.
2. Remove the wheel.
3. Remove inner plastic fender liner. It is attached with 11 Torx head screws (T25).
4. Remove the windshield washer bottle. It is attached by three 10mm screws. Two are accessible through the fender, and the other shares a screw with the power steering bottle. Also remove the hose between the other half of the windshield washer bottle. This will take a little tugging. Be sure to have a bucket ready!
5. The ABS controller will now be accessible. Carefully remove the pump power wire from the bottom of the controller.
6. Remove the main harness connector from the ABS Module by pulling the connector pull shown.
7. Separate the ABS Controller from Value/Pump assemble by unscrewing the six Torx screws (T20). Carefully remove.
8. Prepare to the Module to ship by securing the solenoids so that they will not move around during shipping and wrap in something like bubble wrap.
9. After you receive the repaired Module back, assembly is the reverse of the previously detailed procedure.
10. After reinstallation, it may be necessary clear DTCs with a VAG scanner to clear the ABS light.
Saturday, January 7, 2012
Free Workshop Repair and Troubleshooting Manual for 1990 Mazda RX7 Specs
The following manual apply for 1990 Mazda RX7 series. Here you will find detail yet brief description on procedures for maintaining, servicing, repairing and troubleshooting the Mazda RX7. This workshop manual is divided into sections: Pre-delivery Inspection and Scheduled Maintenance Service, Engine (including engine specification, troubleshooting guide, engine tune-up procedures, compression, on-vehicle maintenance, engine stand installation, inspection and repair assembly, engine stand removal and installation), Lubrication System, Cooling System, Fuel and Emission for Turbo and Non Turbo, Clutch, Automatic and Manual Transmission System, Propeller Shaft, Axles, Steering, Braking, Wheels and Tires, Suspension System, Body,
Readhere - Free Workshop Repair and Troubleshooting Manual for 1990 Mazda RX7 Specs
Saturday, September 3, 2011
Toyota Tercel 1996 Repair Manual

This manual provides step-by-step repair procedures for engine, chassis, electrical review, drivetrain, suspension, steering, and more.
Most of the repair activities
Nissan frontier 2005 Service Repair Manual

This manual contains the maintenance and repair procedures for 2005 NISSAN frontier model D40 series.
It covers the entire vehicle from beginning to end, used by professional mechanics to service or repair your car. It is based on step-by-step instruction & highly detailed breakdown pictures to show you how to perform the job needed accurate & efficient.
Fiat Tipo and Tempra Repair Manual and owner reference information

This guide applies to: Fiat Tipo and Tempra:
-Petrol engines: 1.4 (1372cc) and 1.6 (1580cc)
-Diesel engines: 1.7 D (non 1697-turbo), 1 D, 1 TD and 1.9 TDs (1929 turbo and non turbo)
-Hatchbacks, saloons and estates, 1988-1996
-Manual and Selecta (automatic transmission) models
Renault workshop engine Repair Manual

Applies To:
ENGINES (petrol) 4 cylinders-cast iron:
E5F Clio
E6J Extra, Clio, Renault 19
E7F Clio, Renault 19
E7J Extra, Clio, Renault 19, Megane
Includes:
In this guide you will find three main chapters:
-specifications
-removal of the engine
-composition of the engine
Repair a component on the vehicle's workshop repair manual and technical.
Chevrolet Silverado/GMC Sierra Collision Repair Manual 1999


Download complete Chevrolet Silverado/GMC Sierra collision repair manual guide for model year 1999. This guide presents information using numerals. some of the data is in the manual is on Panel detection, Radiator support Assembly, frame the door opening, the door hinge replacement, Magnesium dashboard support, steering column, intermediate shaft, frame, Service, body dimensions, frame dimensions. This manual should be used by a qualified professional. Download Chevrolet Silverado/GMC Sierra Collision Repair Manual 1999.
Download
Subscribe to:
Posts (Atom)